Five Lessons from Pottery Class

For the last few weeks I’ve spent two hours each Saturday afternoon at a beginning wheel throwing pottery class at an art center downtown. I signed up for the six week class because I wanted to try something new, do something creative, and connect with others in my community. 

Taking this class has reminded me of what it’s like to be a learner and of some lessons we can take into our teaching:

  1. First days can be scary. The morning before my first class I was so anxious. Even though the art center had done a good job explaining where to park, what to wear and what to bring, I was nervous. Now this may have just been me, but I wondered who would be in the class, what would the instructor be like, would I be able to do it? It wasn’t until class was underway that I was able to relax and enjoy.
  2. Students want to know who their teacher is and be part of a community. We’ve had three different instructors, and they’ve all been great. While I don’t need to know every detail of their lives, it helps to hear a little bit about them. I like knowing how long they’ve been making pottery, what they like to make, etc. When the instructor shared that also encouraged others to talk and share. A classroom is a community and community is better when we know each other.
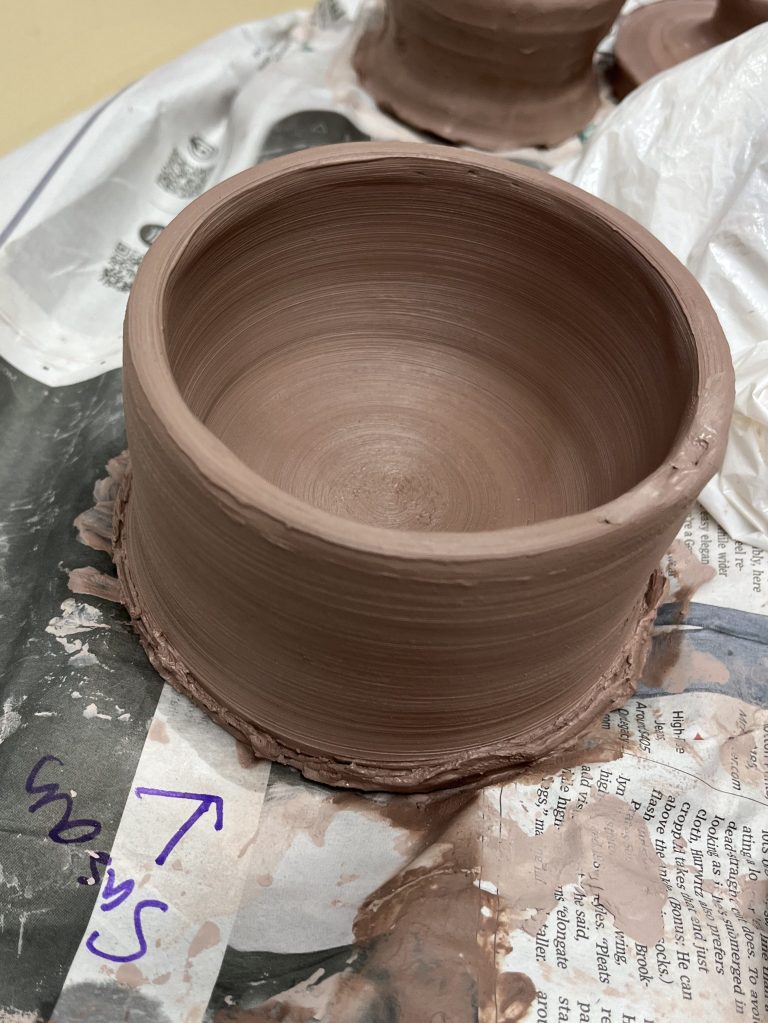
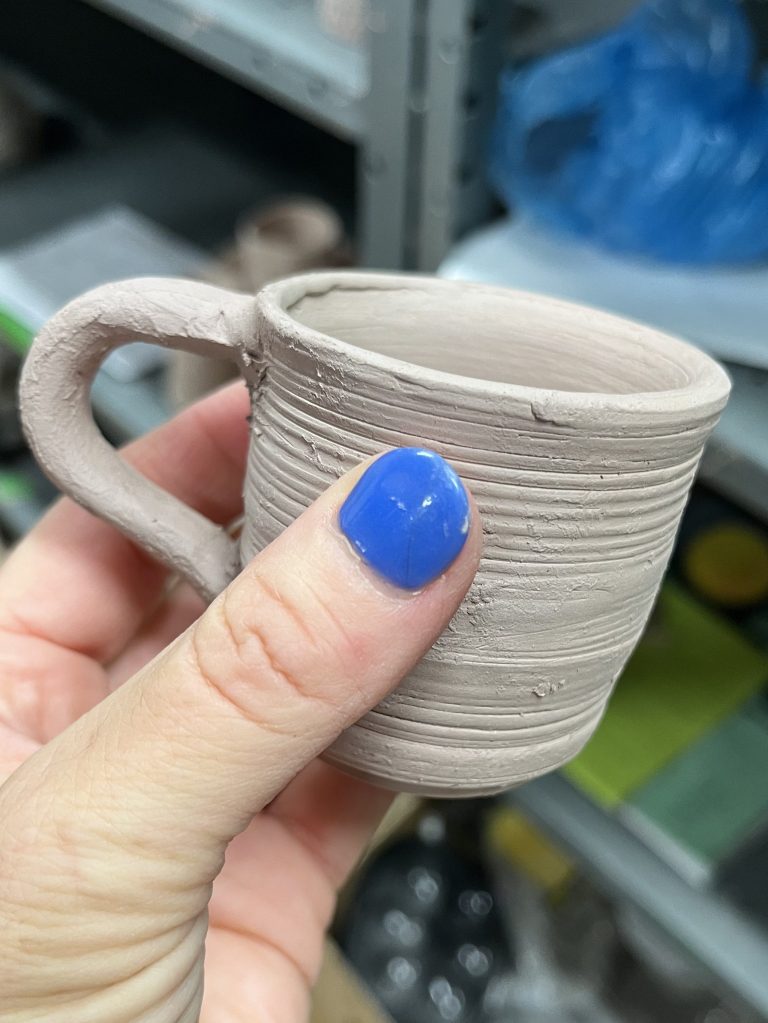
  3. People learn in different ways. At the first class our instructor demonstrated how to use the wheel to center the clay, create a piece of pottery, and remove it from the wheel. It was a lot of steps and I found I couldn’t keep track of all the details – which tools to use when, what angles to hold my hands, what speed to use, etc. One demonstration was not enough to learn everything, so the instructor demonstrates every week and sometimes demonstrates multiple times in class when we have questions. And even though the demonstrations help me tremendously because I can get an idea of where I’m supposed to be going, I also need help from the instructor while I am creating. Even with all of that help, I think I would have also liked to have some written steps and/or pictures I could refer to when I was working independently. It made me think a lot about all the work I’ve been doing recently with Universal Design for Learning and providing students with options.
  4. One opportunity isn’t enough to show what you can do or what you know. Recently I’ve been doing some work with district and school leaders about assessments and standards based grading. In pottery class, creating a piece of pottery was my goal (like a classroom standard). Yesterday when my piece collapsed just before I thought I was finished, I immediately thought “I’m glad I have another chance.” That led me directly back to the idea of how many chances we give our students to try, to fail and then to try again and how we measure those attempts. If I were only “graded” on the one piece that collapsed then I would lose all my motivation. I need multiple chances to show what I was learning. One try was not enough.
  5. Nothing is perfect. Throwing clay has been a humbling experience. As someone who prefers to do things the “right way,” creating art has reminded me that that is not always possible or even the goal. Learning itself can be a goal. Having fun can be a goal. Getting out of your comfort zone can be a goal. And I can enjoy the process of creating and what I’ve created even when my results might not look even or perfect. Learning to accept, and even embrace, when things don’t go the way we thought they would is a lesson we can help our students learn as well.  

As all educators know, teaching and learning are never too far from our minds no matter what we’re doing, but I promise I am having fun with the pottery class. It’s been great to get my hands dirty and do something so outside of my normal activities. 

PS – If you live near Columbia, SC and are interested in pottery, I’d encourage you to check out what Columbia Parks and Recreation Arts Center

My First ISTE Conference Presentation!

This June I had the privilege of presenting at the annual ISTE Conference for the first time and I loved it!

If you’ve ever thought about applying to present at an ISTE Conference – I want to encourage you to go for it. Let me share a little about my experience applying and presenting.

Every summer, ISTE (International Society for Technology in Education) hosts an annual conference for educators from around the world. The conference is huge with an amazing number of different types of sessions: Main stage, Panel, Poster, Research Paper, Playground, Campfire, Interactive and more!  

I love that the conference offers so many types of sessions and that presenters must build their sessions with the ISTE Standards in mind, specifically ISTE Standards for Students and ISTE Standards for Educators.

Creating a Session Proposal

The application for presenting at ISTE is extensive. When you apply, ISTE requires that you share your plan for every aspect of your presentation including intended audience, attendee devices, purpose, objective and supporting research. The application also requires that you clearly indicate which of the ISTE Standards your session addresses and include a complete outline of the session.

I chose to present on a topic I’m passionate about: Universal Design for Learning (UDL). UDL helps address the Student Standards especially Empowered Learner and Creative Communicator. UDL also requires teachers to be effective, proactive Designers of learning experiences (Educator Standards).

With my ISTE Standards and topic chosen, I took time to plan the details of the presentation. I called it “UDL in Action the K-12 Classroom” because I planned to share specific examples from teachers and classrooms in my district. I chose to submit the session as an “interactive session” format. I decided to use the ATLAS model by Weston Kieschnik to organize my presentation because ATLAS focuses on engagement and outcomes. I wanted my attendees to actively participate and walk away with something they could use back in their schools. Then I chose the digital tool that would support my goals: Lumio by SMART. Lumio would allow my audience to participate and for me to get feedback from them throughout the session.

Although the application was extensive, it made it so much easier when the time came to actually put my presentation together and get ready for the conference: the plan was already made.

Conference Time

ISTE does a wonderful job of taking care of the presenters before and during the conference. The communication about the conference ahead of time was clear and helpful.

At the conference, I loved that there was a presenter’s room where I could test the presentation setup the day before my session. I was able to test the audio and video. Just knowing what I would expect the next day helped me feel more relaxed about presenting.

On the morning of my presentation I had two different ISTE technology helpers check to see if everything was working and to make sure I was ready to go – another great ISTE support.

I had an 8:30 presentation and was able to get into the room about 45 minutes early to set up. This allowed me to be ready when people started to arrive. I was able to ask them about their role in education and why they’d chosen to come to my session. I love making those connections before and after a presentation. 

I also laid out the UDL bookmarks I had made. These contained a QR code and shortened URL to my session resources and to the interactive Lumio presentation. On the other side of the bookmark, I had included one of the three UDL areas  (Engagement, Representation, Action & Expression) and the corresponding guidelines and checkpoints.

The session went well and I loved how much everyone actively participated. I had built in different types of interaction. Early on I gathered information about their experience with UDL as well as Lumio.

Throughout the presentation as I shared different examples of “UDL in action,” attendees had a variety of ways to identify which of the UDL guidelines these examples included. They could talk to a neighbor, hold up their UDL bookmark, and/or give digital input via the Lumio presentation. Attendees seemed to enjoy interacting in different ways and that they were able to see the slides on their devices via Lumio.

When the presentation was over, several people came up to talk to me and ask more questions – I always consider that a marker of a successful presentation.

I loved presenting at ISTE and sharing my love of UDL and what a difference a UDL mindset and approach can make for all learners.

When applications open for ISTE 2025, I hope you’ll consider sharing the passion and knowledge you have with others.  If you want to know more, just reach out!

Improving Access to Learning Through UDL*

**This article was originally published on American Consortium for Equity in Education’s Equity & Access website: https://www.ace-ed.org/improving-access-to-learning-through-udl/ (Feb 2024)**

As educators we can agree that providing equal and equitable access to learning is a priority.  But making this happen can be challenging when we consider the variety of students we teach. Students come into our classrooms with different backgrounds, personal needs, and preferences.  

How can educators meet students’ varied needs while also meeting standards and not become overwhelmed?

We can meet these needs by using the Universal Design for Learning (UDL) framework to drive our instruction.  “UDL is a framework to guide the design of learning environments that are accessible and challenging for all” (cast.org). At its core, the UDL framework and guidelines strive to identify and break down barriers to learning and empower students to become expert learners.

When we pair UDL with effective educational technology tools, the opportunities for accessible learning experiences are limitless.  But which of the many edtech tools should we choose?  What should we look for when picking digital resources to use with our students?

Let’s use the 3 principles for UDL as our guide:

Engagement

The first principle of UDL – Multiple Means of Engagement – focuses on providing options for “recruiting interest,” “sustaining effort and persistence,” and “self-regulation.”  But what does that mean when we think about creating accessible digital learning experiences for students?

For me, it means looking for digital tools that will support “one stop shop” learning. Teachers and students have access to so many tools and resources, which can be wonderful, but when we use too many tools at once students can be easily distracted or overwhelmed. So, we need to look for tools that nurture student curiosity and drive student engagement (with the content, the teacher and each other) in one place.

One stop shop learning starts with a learning management system which launches students directly into digital platforms where students can participate in self-contained interactive lessons such as Pear Deck or Lumio. Another great option is Discovery Education, which is offered at no cost to schools in South Carolina by our State Department of Education. With comprehensive K-12 platforms, teachers can create a single resource for a lesson and insert content in a variety of ways including audio and video. Students stay on one platform to complete interactive questions and collaborate with students and the teacher. Teachers can even embed opportunities for student self-assessment and reflection.

I find that staying on one platform does not diminish the variety or creativity of a lesson, but instead helps reduce distractions and frustrations with learning many new tools.  All of these factors help improve students’ persistence and achievement.

Representation

The second principle of UDL – Multiple Means of Representation – focuses on building students who are resourceful and knowledgeable. This is the principle that guides teachers to create instructional materials and choose digital resources that allow students to learn in a variety of ways: auditory, visual, multiple media, etc.

When I design a lesson, I think of possible barriers my students might encounter when accessing the learning (language barriers, limited background knowledge, visual or auditory issues, etc.). I choose tools that will help address those barriers, not only for the students with documented needs, but for all students. Tools that allow students options in how they access information help empower students to become expert learners.

One of the key tools I look for is the integration of Immersive Reader. With Immersive Reader, students can have text read aloud, change the pace of the audio, change fonts, change the size and color of the text, translate text, and use a picture dictionary. The one stop shop platforms mentioned above have Immersive Reader built in. Other tools, like Flip and Wakelet also integrate Immersive Reader. Immersive Reader allows students to overcome barriers and make their own choices in how they read.

In addition, when we use tools embedded with Immersive Reader, we do not have to spend extra time redesigning lesson materials for different students. We are empowering all students to use the tools that work for them while saving teachers’ time: a win-win!

Action and Expression

The final UDL principle – Multiple Means of Action & Expression – focuses on providing students options in how they show what they know. This principle also addresses students’ executive functioning with the goal of them becoming strategic and goal directed.

Choice is an essential element of UDL. When looking at resources that support accessible learning opportunities, we need to find tools that offer students more than one way to show what they know.

For example, students in a Modern World History class need to “Summarize how major world revolutions created new global affairs and interactions” (SC Standard MWH.2.CE).  The standard doesn’t say they have to write a paper to show their understanding. So, we want to choose tools that allow students to respond in a variety of ways: write, speak, visualize, etc. while still being accessible and easy to use.

Some of my favorite tools for having students create and demonstrate their learning include Flip, Kami, and the core Google Tools. Students can record videos and use text to speech options.  Kami is also a useful tool for full accessibility options since it will read text aloud to students and allows students and teachers to insert comments in a variety of ways (text, voice, video, and screen capture).  These tools also help with the one stop shop goal since teachers’ directions and students’ responses can all be contained within the same file.

Keeping the three principles of UDL in mind will help educators sort through the many digital options available and choose a few core tools that will best meet the needs of all students. By doing so, we can ensure that all students have accessible learning opportunities.